How to Start a Sourdough Starter: The Easiest Method for Beginners
Have you ever wanted to learn how to start a sourdough starter? It’s easier than you think! A sourdough starter is the foundation of delicious homemade sourdough bread, and it can be a rewarding journey for any home baker. The beauty of sourdough lies in its unique fermentation process, which produces a rich, tangy flavor that’s simply irresistible. However, starting a sourdough starter might feel daunting to some, but don’t worry; this guide will walk you through it step by step.
Visualize your kitchen filled with the warm, comforting aroma of freshly baked sourdough bread. The golden crust crackling as you slice into it, revealing a soft, airy interior with those delightful holes. The stunning contrast of a crisp crust and a chewy crumb makes sourdough not only a treat for the taste buds but also a feast for the eyes. As you slice into that loaf, do you ever wonder how it all begins? What if I told you that it starts with just a few simple ingredients and a little patience?
As you embark on this baking adventure, the emotion of pride and accomplishment will wash over you when you see your starter bubbling and rising. Each day brings new excitement as you feed your starter and watch it transform into a living culture. The process of nurturing your sourdough starter is just as rewarding as the bread itself. You’ll be amazed at the sensory experience—your fingertips will feel the texture of the flour, the water will be cool and refreshing, and the smell of the fermentation will tantalize your senses.
In addition to the sensory delight, the colors you’ll witness as your starter develops will be vibrant and inviting. From the creamy whites of the flour to the earthy tones of whole wheat, each ingredient plays a vital role. The taste of your homemade sourdough, with its sweet and slightly tangy notes, will be unlike anything you’ve ever experienced. Are you ready to dive into the world of sourdough?
Sourdough starters are perfect for a variety of occasions. They are not only ideal for everyday baking but also make excellent gifts. Imagine gifting a jar of your homemade starter to a friend, complete with easy-to-follow instructions. Sourdough is a delightful conversation starter at gatherings, and sharing your love for bread baking can inspire others to join in on the fun. Plus, they are a great addition to any dessert table, elevating your baking game and impressing your guests.
The best part about sourdough starters is that they are portable and easy to manage. You can take your starter with you when traveling or store it in the fridge for a while if you’re not ready to bake. This means that you can enjoy fresh, homemade bread whenever the craving strikes. Additionally, the social media appeal of sourdough is undeniable. Whether you’re sharing your progress on Instagram or pinning your creations on Pinterest, the world of sourdough baking encourages creativity and community.
So, why does this particular recipe for starting a sourdough starter stand out? First, it’s designed for efficiency. You’ll learn how to create a vibrant starter with just five simple tips that are perfect for beginners. Moreover, this method is beginner-friendly, so even if you’ve never baked bread before, you’ll find success with this guide. You’ll discover how to customize your starter by adding different flours or adjusting the feeding schedule to suit your lifestyle.
Another advantage of this method is that you can easily prepare multiple starters at once, making it a great option for those who want to share the love of baking. You can even consider selling your starters if you become proficient enough! With this easy method, you’ll not only learn the basics of sourdough but also gain the confidence to explore more complex recipes in the future.
Now, let’s dive into a quick summary of what you can expect from this process. You’ll need to set aside about 10 minutes each day for preparation, and within a week, you’ll have a lively sourdough starter ready for baking. This recipe yields one starter, which can be used for countless loaves of bread. The skill level is beginner-friendly, making it perfect for anyone eager to start their sourdough baking journey.
What is a Sourdough Starter?
A sourdough starter is a mixture of flour and water that captures wild yeast and bacteria from the environment, allowing you to create delicious, naturally leavened bread. Unlike conventional yeast, sourdough relies on these natural microorganisms to ferment the dough, resulting in a tangy flavor and unique texture. This method of bread-making has been around for thousands of years and is enjoying a renaissance in home kitchens worldwide.
Why You Will Love This Method
- Easy to prepare in bulk: This method allows you to create multiple starters at once, perfect for sharing with friends.
- Customizable colors and themes: You can experiment with different types of flour to create unique flavors and colors.
- Perfect for party presentation: Homemade sourdough bread is always a hit at gatherings and celebrations.
- Kid-friendly and mess-free: Involve your children in the process for a fun and educational baking experience.
- Ideal for selling or gifting: Create a starter to sell at local markets or gift to friends and family.
Ingredients You Need
- All-purpose flour — the foundation of your starter, providing structure and flavor.
- Water — essential for hydration and activating the fermentation process.
- Whole wheat flour — adds nutrients and helps capture wild yeast more effectively.
- Filtered water — ensures that no chlorine or impurities interfere with the fermentation.
How to Start a Sourdough Starter Step by Step
- Day 1: In a clean glass jar, combine 100 grams of all-purpose flour with 100 grams of filtered water. Stir until well mixed, cover loosely with a lid or cloth, and let it sit at room temperature for 24 hours.
- Day 2: You may not see much activity yet. Discard half of the mixture (about 100 grams) and add another 100 grams of all-purpose flour and 100 grams of filtered water. Mix well and let it rest again.
- Day 3: You should start to see some bubbles forming. Repeat the discard and feed process, using the same ratios as before.
- Day 4: By now, your starter should be more active and bubbly. Continue the discard and feed routine, and you may consider incorporating whole wheat flour for added flavor.
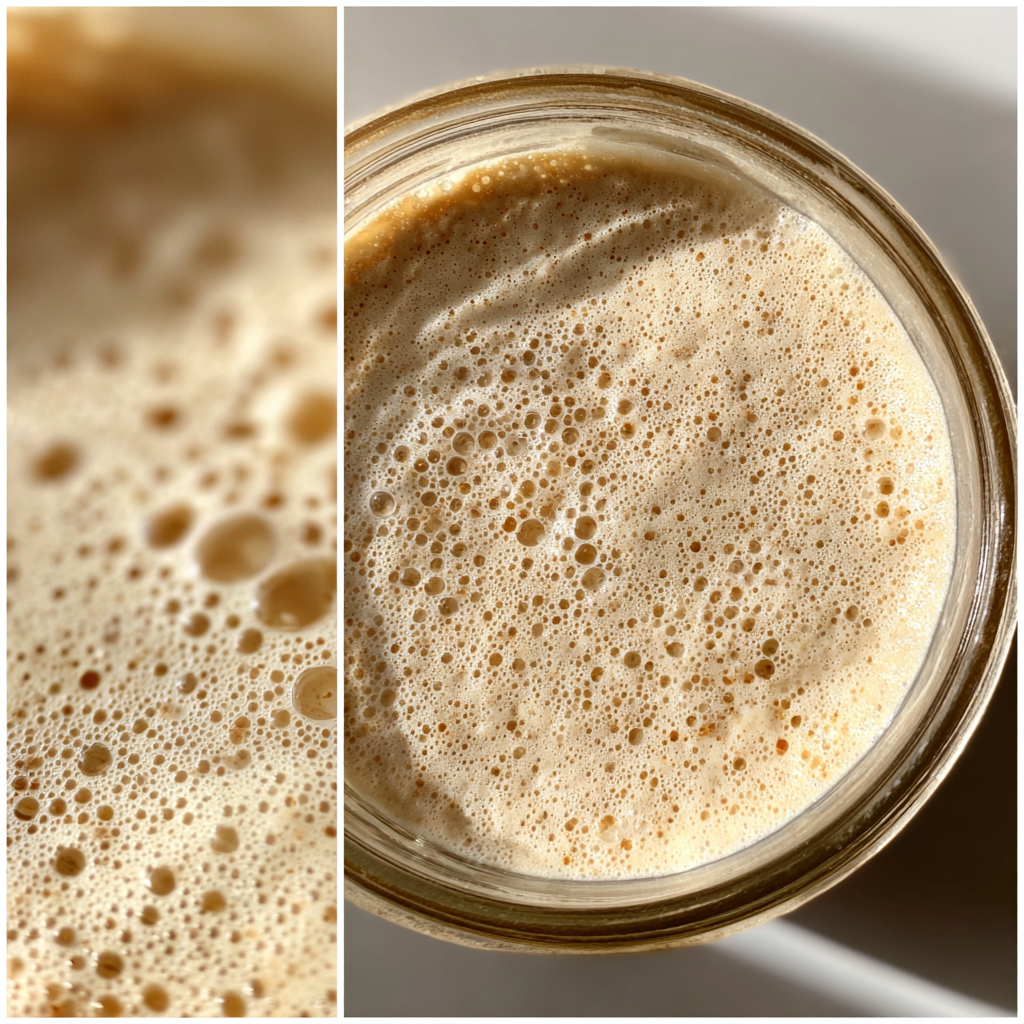
- Day 5: Your starter should be doubling in size within 4-6 hours of feeding. If it is, congratulations! You have a lively sourdough starter. If not, continue feeding it daily until it reaches this stage.
- Day 6: Your starter is ready to use for baking! You can now store it in the fridge if you don’t plan to bake right away. Just remember to feed it once a week to keep it healthy.
Pro Tip: Be patient! Sourdough starters can take anywhere from 5 to 14 days to become fully active, depending on the environment.
Expert Tips for Best Results
- Use fine crumbs for a smooth texture: Ensure your flour is finely milled for the best results.
- Avoid too much frosting: Stick to the recommended ratios to maintain the starter’s balance.
- Keep coating temperature stable: Room temperature is ideal for fermentation.
- Work in batches: If you want to create multiple starters, do so simultaneously for consistent results.
- Use deep cups for dipping: This will make feeding the starter easier and less messy.
- Tap gently for a smooth finish: Avoid overworking your starter to maintain its bubbles.
Variations and Substitutions
- Whole wheat sourdough starter: Use only whole wheat flour for a nuttier flavor.
- Rye flour option: Incorporate rye flour for a more robust starter.
- Gluten-free option: Experiment with gluten-free flours like brown rice or oat flour.
- Dairy addition: Some bakers add yogurt or buttermilk for extra tang.
- Flavor variations: Consider adding herbs or spices to your starter for unique flavors.
How to Serve and Store
Serving: Use your sourdough starter to bake delicious bread, pancakes, or even pizza dough.
Storage: Keep your starter in the fridge for up to 1 week without feeding, or feed it weekly to keep it active.
Freezing: Yes, you can freeze your starter in an airtight container for up to 3 months.
Reheating: Not required; simply feed your starter and let it come to room temperature before baking.
Frequently Asked Questions
How long does it take to create a sourdough starter?
It typically takes about 5 to 14 days for a sourdough starter to become fully active.
Can I freeze my sourdough starter?
Yes, you can freeze your starter for up to three months. When ready to use, thaw and feed it as usual.
Why is my sourdough starter not bubbling?
Temperature, flour quality, and feeding schedule can affect bubbling. Ensure you’re in a warm environment and feeding it regularly.
Can I make bread without a sourdough starter?
Yes, but using a sourdough starter enhances flavor and texture. It’s worth the effort!
How often should I feed my sourdough starter?
Feed it once a week if stored in the fridge, or every 24 hours if kept at room temperature.
Can I sell my sourdough starter?
Yes, many bakers successfully sell their starters. Ensure they are well-fed and healthy for optimal results.
In conclusion, learning how to start a sourdough starter can be one of the most satisfying culinary endeavors you embark on. This beginner-friendly method not only simplifies the process but also offers flexibility and creativity. Whether you’re baking for yourself or sharing with friends, the joy of sourdough will surely elevate your baking game. Try it today, and don’t forget to share your results!
Print
How to Start a Sourdough Starter: 5 Proven Tips for Beginners
Description
Starting a sourdough starter is easier than you think! This beginner-friendly method will have you bubbling and rising in no time.
Ingredients
- 1 cup cups All-purpose flour
- 1/2 cup cups Water
- 1/4 cup cups Whole wheat flour
- 1/2 cup cups Filtered water
Instructions
- In a clean glass jar, mix together the all-purpose flour and whole wheat flour.
- Add the 1/2 cup of filtered water and stir until there are no dry lumps.
- Cover the jar with a clean cloth or a lid that is not airtight, allowing air to flow in.
- Let the mixture sit at room temperature (around 70°F or 21°C) for 24 hours.
- After 24 hours, check for bubbles. If you see some, it means fermentation has started. If not, wait another day.
- Feed the starter by discarding half of the mixture and adding 1/2 cup of water and 1 cup of flour. Stir well.
- Repeat this feeding process every 24 hours for about 5-7 days, or until your starter is bubbly and has doubled in size within a few hours of feeding.
Notes
- Use a non-reactive container like glass or plastic for your starter.
- If your starter develops a dark liquid on top, it’s called hooch and can be stirred back in or discarded.
- A healthy sourdough starter should have a pleasant, tangy smell.
- Once established, you can refrigerate your starter and feed it once a week.
Nutrition
- Serving Size: 1 tablespoon
- Calories: 20
- Sugar: 0
- Fat: 0
- Carbohydrates: 4
- Fiber: 0
- Protein: 0.5
Keywords: sourdough starter, how to start sourdough, easy sourdough starter, beginner sourdough recipe, sourdough for beginners