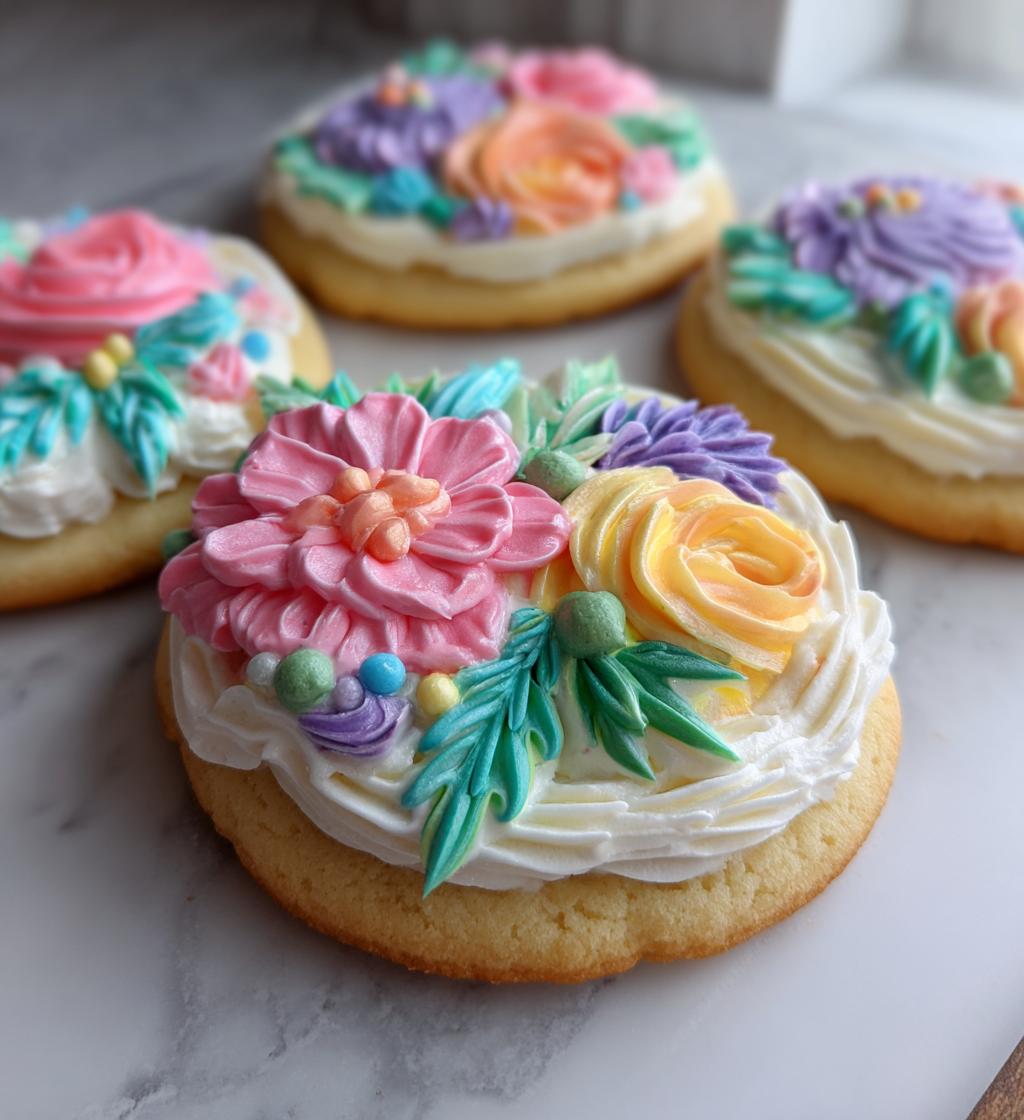
Oh, the joy of spring! It’s that magical time of year when flowers bloom and everything feels fresh and bright. What better way to celebrate than with delightful spring cookies decorated with buttercream? Trust me, these cookies are not just any ordinary treat; they’re little canvases for your creativity, waiting to be brought to life with vibrant colors and beautiful designs!
This recipe is a fabulous mix of simplicity and joy. With just a handful of ingredients, you’ll be whipping up soft, buttery cookies that melt in your mouth. The real showstopper, though? That luscious buttercream icing! You can use your favorite food colors to create stunning designs that are perfect for any springtime occasion, from birthday parties to family gatherings.
So, roll up your sleeves and get ready to indulge in these charming spring cookies decorated with buttercream. They’re a treat for both the eyes and the taste buds, and I promise they’ll become a new favorite in your baking repertoire!
Ingredients List
Gathering the right ingredients is key to making these delightful spring cookies decorated with buttercream. Here’s what you’ll need:
- 2 3/4 cups all-purpose flour: This is the backbone of your cookies, giving them that perfect structure. Make sure to spoon the flour into your measuring cup and level it off for accuracy.
- 1 teaspoon baking soda: This helps your cookies rise beautifully, giving them that soft and chewy texture we all adore.
- 1/2 teaspoon baking powder: Just a little extra lift! It works hand-in-hand with the baking soda to create the perfect cookie.
- 1 cup unsalted butter, softened: This is where the magic happens! Softened butter mixes better and creates that rich flavor. Let it sit at room temperature for about an hour before you start.
- 1 1/2 cups white sugar: Sweet, sweet sugar! This balances the flavors and adds that delightful sweetness to your cookies.
- 1 egg: Just one egg brings everything together and adds moisture. Make sure it’s at room temperature for the best results.
- 1 teaspoon vanilla extract: This classic flavor enhances the sweetness and makes your cookies smell heavenly as they bake!
- 1/2 teaspoon almond extract: A little splash of almond adds a lovely depth of flavor that pairs beautifully with the vanilla.
- 3 cups buttercream icing: The star of the show! You can either buy it pre-made or whip up your own at home. Either way, it’s what turns these cookies into a spring masterpiece!
- Food coloring (optional): Use your favorite colors to bring your buttercream to life! Just a few drops can make a big difference in how festive your cookies look.
With these ingredients in hand, you’re all set to create the most delightful spring cookies that will not only taste amazing but look stunning too! Let’s get baking!
How to Prepare Spring Cookies Decorated Buttercream
Now that you’ve gathered your ingredients, it’s time to dive into the fun part: making these fabulous spring cookies decorated with buttercream! Don’t worry; I’ll guide you through each step, so you’ll feel like a pro in no time. Let’s get started!
Step-by-Step Instructions
- Preheat your oven: First things first, preheat your oven to 375°F (190°C). This step is crucial! A properly heated oven ensures your cookies bake evenly and get that delightful golden color.
- Mix the dry ingredients: In a medium bowl, whisk together the flour, baking soda, and baking powder. This helps to evenly distribute the leavening agents throughout the flour, which is key for the perfect rise!
- Cream the butter and sugar: In a larger bowl, beat the softened butter and white sugar together until the mixture is smooth and creamy. You want it to be light and fluffy, which usually takes about 3-4 minutes. Trust me, this is where the magic begins!
- Add the wet ingredients: Next, crack in the egg and pour in the vanilla and almond extracts. Mix until everything is well combined. You’ll love how fragrant your kitchen smells at this point!
- Combine dry and wet ingredients: Gradually add the dry mixture to your creamed butter mixture. I like to do this in three parts, alternating with a little mixing in between. This prevents the flour from flying everywhere and helps create a nice, smooth dough.
- Form the cookies: Now, scoop the dough and roll it into balls about 1 inch in diameter. Place these on ungreased baking sheets, leaving enough space for them to spread while baking. I usually fit about 12 cookies on a standard sheet.
- Bake to perfection: Pop those beauties in the oven and bake for 8 to 10 minutes. Keep an eye on them! You want the edges to be lightly golden, while the centers should still look a tad soft. They’ll firm up as they cool.
- Cool completely: Once baked, remove the cookies from the oven and let them cool on the baking sheets for about 5 minutes. Then, transfer them to a wire rack to cool completely. Patience is key here—trust me, they’re worth the wait!
- Decorate with buttercream: Finally, it’s time for the fun part—decorating! Use your buttercream icing to pipe beautiful designs on top of your cooled cookies. Let your creativity shine! If you’ve added food coloring, this is where it really comes to life.
And just like that, you’ve transformed simple ingredients into stunning spring cookies decorated with buttercream! I can’t wait for you to taste them. Enjoy the process, and remember, it’s all about having fun in the kitchen!
Tips for Success
As you embark on your journey to create the perfect spring cookies decorated with buttercream, a few handy tips can make all the difference! These little nuggets of wisdom will help you avoid common pitfalls and ensure your cookies come out looking and tasting fabulous.
Use Room Temperature Ingredients
Make sure your butter and egg are at room temperature before you start mixing. This helps them combine more easily, creating that fluffy texture we all love. If you forget to take them out ahead of time, just place the butter in a warm spot or gently warm the egg in a bowl of warm water for a few minutes.
Don’t Overmix the Dough
It’s super tempting to keep mixing until everything is perfectly smooth, but overmixing can lead to tough cookies. Mix just until the dry and wet ingredients are combined. A few small lumps are totally okay! You want your cookies to be soft and tender, not chewy.
Chill the Dough If Needed
If your dough feels too soft or sticky after mixing, don’t hesitate to pop it in the fridge for about 30 minutes. Chilling helps the dough firm up, making it easier to roll and shape. Plus, it keeps your cookies from spreading too much during baking!
Keep an Eye on Baking Time
Ovens can be sneaky, so start checking your cookies at the 8-minute mark. Depending on your oven and the size of your cookies, they might bake a little faster or slower. You’re looking for a light golden edge and a slightly soft center—don’t worry; they’ll continue to cook as they cool!
Let Icing Dry Before Stacking
After decorating your lovely cookies, let the icing dry completely before stacking them up. This prevents smudging and keeps your designs looking pristine. I usually leave them out for at least an hour, but you can speed things up by placing them in the fridge for a bit.
With these tips in your back pocket, you’re all set to create beautiful, delicious spring cookies decorated with buttercream that will wow your family and friends! Happy baking!
Variations
Now that you’ve mastered the classic spring cookies decorated with buttercream, let’s explore some fun variations to keep things exciting! These creative ideas will let you mix it up and add your own personal touch to this delightful recipe.
Different Flavors of Buttercream
Why not experiment with different buttercream flavors? You can easily swap out the vanilla for other extracts to create unique tastes:
- Chocolate Buttercream: Mix in cocoa powder or melted chocolate for a rich, indulgent twist.
- Lemon Buttercream: Add fresh lemon juice and zest to give your cookies a zesty, refreshing flavor that pairs beautifully with spring themes.
- Mint Buttercream: A touch of mint extract will create a cool, refreshing icing that’s perfect for spring celebrations.
- Strawberry Buttercream: Incorporate fresh strawberry puree or strawberry extract for a fruity, sweet topping that screams summer!
Fun Cookie Shapes
Instead of the classic round cookies, why not shape them into fun spring-themed designs? You can use cookie cutters to create:
- Flowers: Perfect for Easter or Mother’s Day, flower-shaped cookies are a beautiful way to showcase your decorating skills!
- Bunnies: Easter bunnies are a hit! These adorable shapes can be decorated with pastel-colored buttercream, making them extra cute.
- Butterflies: Delicate butterfly cookies can be adorned with vibrant colors for a whimsical touch that captures the essence of spring.
Add Sprinkles and Edible Decorations
Take your buttercream artistry to the next level by adding sprinkles, edible glitter, or even fondant decorations on top of your icing. This adds a fun texture and can make your cookies look like they belong in a bakery window!
Stuffed Cookies
If you’re feeling adventurous, consider making stuffed cookies! You can create a small indentation in the center of your cookie dough balls before baking and fill them with:
- Nutella: A delicious chocolate-hazelnut surprise!
- Fruit Jam: A dollop of your favorite jam adds a fruity burst in every bite.
- Marshmallow Fluff: For a gooey, sweet center that kids will absolutely love!
With these variations, your spring cookies decorated with buttercream will never get boring! Mix and match these ideas to create a delightful array of treats that will impress everyone at your next gathering. Happy baking and decorating!
Storage & Reheating Instructions
Once you’ve baked and decorated your beautiful spring cookies, you’ll want to make sure they stay fresh and delicious! Proper storage is key to keeping them tasting their best. Here’s how to do it:
Storing Your Cookies
To keep your spring cookies decorated with buttercream in tip-top shape, follow these simple steps:
- Cool Completely: Before storing, make sure your cookies are completely cool. This prevents any moisture from building up and making them soggy.
- Airtight Container: Place the cookies in an airtight container. I like to use one with a lid that seals tightly. This helps keep them fresh for longer!
- Layering: If you need to stack your cookies, place a sheet of parchment paper between layers. This prevents the buttercream from sticking and keeps your designs looking pristine.
- Room Temperature: You can store them at room temperature for about 3 to 5 days. Just make sure they’re in a cool, dry place away from direct sunlight.
Freezing for Longer Storage
If you want to keep those tasty cookies for longer, freezing is a great option:
- Freeze Before Icing: If you plan to freeze your cookies, I recommend doing it before decorating them with buttercream. Simply bake, cool, and store them in an airtight container or freezer bag.
- Thawing Cookies: When you’re ready to enjoy, take them out of the freezer and let them thaw at room temperature for a few hours. Once they’re thawed, you can decorate them!
Reheating Cookies
If you prefer your cookies warm (who doesn’t?), here’s how to reheat them without losing that soft texture:
- Microwave Method: Place a cookie on a microwave-safe plate. Cover it with a damp paper towel and heat for about 10-15 seconds. This keeps them soft and chewy!
- Oven Method: Preheat your oven to 350°F (175°C). Place the cookies on a baking sheet and warm them for about 5 minutes. This method is great if you have a batch to heat up all at once.
So, whether you’re storing them for later or enjoying them fresh out of the oven, these tips will ensure your spring cookies decorated with buttercream remain a hit! Happy baking and indulging!
Nutritional Information
As you indulge in these delightful spring cookies decorated with buttercream, it’s always nice to know what you’re enjoying! Here’s the estimated nutritional breakdown for one cookie:
- Calories: 150
- Total Fat: 7g
- Saturated Fat: 4g
- Unsaturated Fat: 2g
- Trans Fat: 0g
- Cholesterol: 20mg
- Sodium: 50mg
- Total Carbohydrates: 20g
- Dietary Fiber: 0g
- Sugars: 8g
- Protein: 2g
Keep in mind, these values can vary based on specific ingredients and portion sizes, but it gives you a good idea of what to expect. Enjoy every delicious bite, and remember that a little sweetness is always worth it!
FAQ Section
Got questions about these delightful spring cookies decorated with buttercream? Don’t worry; I’ve got you covered! Here are some common queries and their answers to help you out:
What’s the best way to decorate the cookies?
The best way to decorate your spring cookies is to use a piping bag with different tips to create various designs! You can use a round tip for simple dots and swirls or a star tip for beautiful rosettes. Don’t forget to let your creativity shine! If you’re feeling adventurous, add sprinkles or edible glitter for an extra pop!
Can I make the dough ahead of time?
Absolutely! You can prepare the cookie dough in advance and store it in the refrigerator for up to 3 days. Just make sure to wrap it tightly in plastic wrap. If you want to keep it longer, you can freeze the dough for up to 3 months. When you’re ready to bake, let it thaw in the fridge overnight before rolling it out!
What if my buttercream icing is too runny?
If your buttercream icing turns out too runny, don’t panic! You can fix it by adding more powdered sugar, a tablespoon at a time, until you reach your desired consistency. If it’s too thick, add a tiny splash of milk or cream to loosen it up. Remember, you want it to be spreadable but not so runny that it drips off the cookies!
Can I use gluten-free flour for this recipe?
Yes, you can! Just make sure to use a 1:1 gluten-free flour blend that contains xanthan gum. This will help mimic the structure of all-purpose flour and give you a similar texture in your cookies. Just keep an eye on the baking time, as gluten-free versions can sometimes bake a bit differently.
How do I prevent my cookies from spreading too much during baking?
To prevent your cookies from spreading too much, make sure your butter is softened but not melted. If your dough feels too soft, you can chill it for about 30 minutes before baking. Chilling helps firm up the fat, which keeps your cookies from spreading too much in the oven.
With these answers in hand, you’re well-equipped to tackle any challenges that come your way while making your spring cookies decorated with buttercream! Happy baking, and enjoy the delicious results!
Print
Spring Cookies Decorated Buttercream: 5 Sweet Masterpieces
- Total Time: 30 minutes
- Yield: 24 cookies 1x
- Diet: Vegetarian
Description
These spring cookies are decorated with buttercream icing for a delightful treat.
Ingredients
- 2 3/4 cups all-purpose flour
- 1 teaspoon baking soda
- 1/2 teaspoon baking powder
- 1 cup unsalted butter, softened
- 1 1/2 cups white sugar
- 1 egg
- 1 teaspoon vanilla extract
- 1/2 teaspoon almond extract
- 3 cups buttercream icing
- Food coloring (optional)
Instructions
- Preheat the oven to 375°F (190°C).
- In a bowl, mix flour, baking soda, and baking powder.
- In another bowl, cream butter and sugar until smooth.
- Add egg, vanilla extract, and almond extract to the butter mixture.
- Gradually blend in the dry ingredients.
- Roll dough into balls and place on baking sheets.
- Bake for 8 to 10 minutes.
- Let cookies cool completely.
- Decorate with buttercream icing.
Notes
- Store cookies in an airtight container.
- Use different food colors for various designs.
- Allow icing to dry before stacking cookies.
- Prep Time: 20 minutes
- Cook Time: 10 minutes
- Category: Dessert
- Method: Baking
- Cuisine: American
Nutrition
- Serving Size: 1 cookie
- Calories: 150
- Sugar: 8g
- Sodium: 50mg
- Fat: 7g
- Saturated Fat: 4g
- Unsaturated Fat: 2g
- Trans Fat: 0g
- Carbohydrates: 20g
- Fiber: 0g
- Protein: 2g
- Cholesterol: 20mg
Keywords: spring cookies, buttercream, decorated cookies, dessert