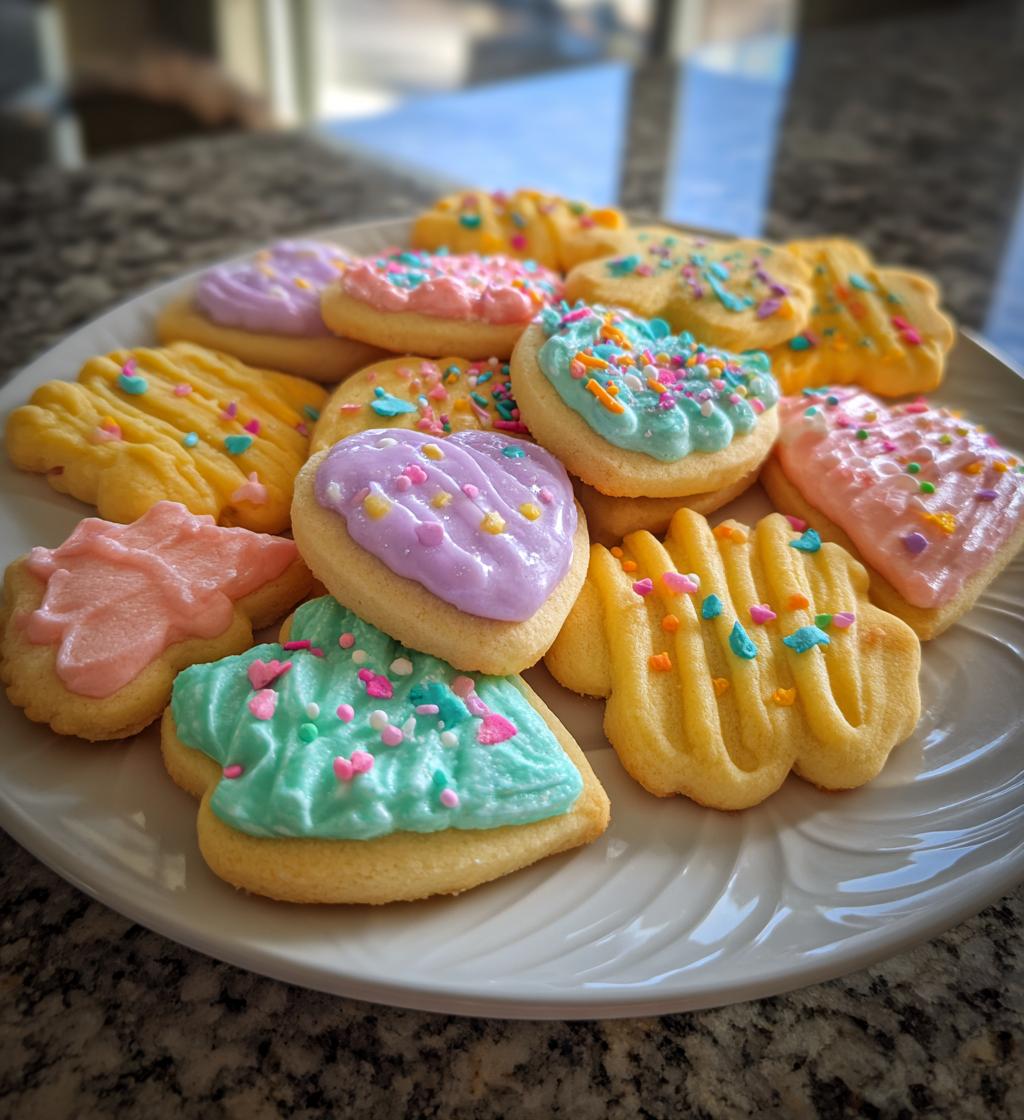
Ah, spring! The season where flowers bloom and everything feels fresh and alive. There’s just something magical about baking cookies during this time – the warm scent wafting through the house, the vibrant colors, and the sheer joy of it all! That’s why I’m thrilled to share my favorite recipe for spring cookies that not only taste delightful but also embody a beautiful *spring cookies aesthetic*. Picture delightful pastel shades and whimsical shapes that bring a smile to anyone’s face. These cookies are perfect for brightening up your day or impressing friends at a spring gathering. Trust me, you’re going to want to whip these up and let your creativity shine!
Ingredients List
To make these delightful spring cookies, you’ll need the following ingredients:
- 2 cups all-purpose flour
- 1 cup unsalted butter, softened
- 1 cup granulated sugar
- 1 large egg
- 1 teaspoon vanilla extract
- 1/2 teaspoon baking powder
- 1/4 teaspoon salt
- Food coloring (various colors)
- Sprinkles (optional)
Make sure your butter is softened to room temperature for that perfect creamy texture when blending. It’s going to make all the difference in your cookies!
How to Prepare Instructions
Preheat the Oven
First things first, let’s get that oven preheating to 350°F (175°C). Preheating is super important because it ensures that your cookies bake evenly and turn out just right! So, while you’re gathering your ingredients, let that oven warm up and get ready for some deliciousness.
Creaming the Butter and Sugar
Next, grab a large mixing bowl and cream together the softened butter and granulated sugar. This step is key, my friends! Use a hand mixer or a good old-fashioned wooden spoon to beat them together until the mixture turns light and fluffy. You’re looking for a pale yellow color and a texture that’s almost airy. This process introduces air into the mix, which is essential for giving your cookies that perfect chewy texture. Trust me, you don’t want to skip this step!
Combining Ingredients
Once your butter and sugar are creamed, it’s time to add in the egg and vanilla extract. Mix well until everything is fully combined. In a separate bowl, whisk together the flour, baking powder, and salt. This is where things get a bit fun! Gradually incorporate the dry mixture into the wet mixture, about a third at a time. This gentle folding helps prevent any overmixing, which can lead to tough cookies. Keep mixing until just combined, and don’t worry if there are a few flour streaks left – we’ll take care of that soon!
Coloring the Dough
Here comes the creative part! Divide your dough into portions based on how many colors you want to use. Add a few drops of food coloring to each portion and knead the dough until the colors are vibrant and even. Mix and match colors to create your own springtime palette. I love using pastel shades like soft pinks, yellows, and greens – they really scream spring! But hey, go wild – make it as colorful as you like!
Shaping and Baking the Cookies
Now, it’s time to shape those beauties! Roll the colored dough into small balls and place them on a baking sheet lined with parchment paper, leaving some space between each cookie to allow for spreading. If you want to add sprinkles, now’s the time to sprinkle them on top! Pop the baking sheet into your preheated oven and bake for 10-12 minutes. Keep an eye on them; you want the edges to be lightly golden but the centers to remain soft. When they’re ready, let them cool on the baking sheet for a few minutes before transferring to a wire rack. Voilà! Your spring cookies are now ready to impress!
Tips for Success
To ensure your spring cookies turn out perfectly every time, here are a few handy tips that I swear by:
- Use room temperature ingredients: Make sure your butter and egg are at room temperature before starting. This helps them blend more smoothly, leading to a better cookie texture.
- Don’t overmix: When combining the wet and dry ingredients, mix just until everything is incorporated. Overmixing can lead to tough cookies, and we definitely want them to be soft and chewy!
- Experiment with shapes: Use cookie cutters for fun shapes that fit the spring theme! Flowers, bunnies, or even abstract shapes can add a festive touch to your cookie platter.
- Watch the baking time: Keep a close eye on your cookies in the last few minutes of baking. Ovens can vary, and you want to catch them as soon as the edges are golden but still soft in the center.
- Let them cool: Allow your cookies to cool on the baking sheet for a few minutes before transferring them to a wire rack. This helps them set and prevents breakage!
With these tips, you’ll be well on your way to creating stunning and delicious spring cookies that everyone will love!
Nutritional Information
Here’s a quick look at the estimated nutritional values for each delightful spring cookie:
- Calories: 150
- Fat: 7g
- Saturated Fat: 4g
- Unsaturated Fat: 2g
- Trans Fat: 0g
- Cholesterol: 20mg
- Sodium: 60mg
- Carbohydrates: 20g
- Sugar: 8g
- Fiber: 0g
- Protein: 1g
Keep in mind that these values are estimates and can vary based on the specific ingredients you use. But hey, a little indulgence is totally worth it for these tasty spring cookies! Enjoy every colorful bite!
FAQ Section
Can I use different flavors in the cookies?
Absolutely! While the classic vanilla extract gives these cookies a lovely base flavor, you can really shake things up with different extracts. For a nutty twist, try adding almond extract instead. It adds a subtle richness that pairs beautifully with the sweetness of the cookies. Or, if you’re feeling zesty, lemon extract brings a bright, refreshing flavor that screams spring! Just remember to start with a small amount and adjust to your taste – you can always add more, but you can’t take it out!
How do I store leftover cookies?
To keep your spring cookies fresh and delicious, store them in an airtight container at room temperature. They’ll typically last about a week, but trust me, they probably won’t last that long! If you want to keep them even fresher, you can layer them with parchment paper to prevent sticking. Just remember, if you add any icing or toppings, wait until they’re completely set before stacking them up!
Can I freeze the cookie dough?
You bet! Freezing cookie dough is a fantastic way to have fresh cookies on hand whenever the craving strikes. To freeze, simply scoop out the dough into balls and place them on a baking sheet lined with parchment paper. Freeze until solid, then transfer the dough balls to a zip-top freezer bag. When you’re ready to bake, there’s no need to thaw them! Just pop them straight into the oven, adding an extra minute or two to the baking time. It’s like having a little taste of spring whenever you want!
Why You’ll Love This Recipe
- Quick and easy: With just a 20-minute prep time and only 12 minutes in the oven, you’ll have delicious cookies in no time!
- Visually appealing: These cookies are a feast for the eyes! Their vibrant colors and fun shapes make them perfect for any spring celebration.
- Perfect for gatherings: Whether it’s a picnic, birthday party, or a casual get-together, these cookies are sure to impress your guests and brighten the mood.
- Customizable: You can easily switch up the colors and shapes to match your theme or personal style. Get creative and make them uniquely yours!
- Deliciously fun: The combination of sweet flavors and chewy texture makes these cookies irresistible. Each bite is a burst of joy that captures the essence of spring!
Serving Suggestions
Now that you’ve baked up these gorgeous spring cookies, let’s talk about how to present and serve them for maximum impact! Trust me, a little creativity goes a long way in making your cookies the star of the show.
For a delightful spring gathering, consider arranging your cookies on a large, colorful platter. You can mix in some fresh flowers or green leaves to give it that garden-party vibe – it’s all about that *spring cookies aesthetic*! I love using pastel-colored napkins or even wrapping the cookies in clear cellophane tied with a cheerful ribbon for a lovely gift idea.
If you’re feeling extra festive, why not pair these cookies with a refreshing drink? A pitcher of homemade lemonade or iced tea with slices of lemon and mint leaves is a perfect match. The bright flavors complement the sweetness of the cookies beautifully!
For a fun twist, you could also create a cookie bar! Set up a little station with various toppings like whipped cream, chocolate drizzle, or even extra sprinkles. Guests can customize their cookies right before enjoying them – it’s interactive and adds a splash of excitement to any party!
Whatever you decide, these spring cookies are sure to bring smiles and joy to your table. Enjoy every moment of sharing them with friends and family!
Equipment List
Gathering the right tools before you get started will make the whole process smoother and more enjoyable! Here’s what you’ll need to whip up those delightful spring cookies:
- Mixing bowls: A couple of medium bowls for creaming and combining your ingredients.
- Measuring cups and spoons: Accurate measurements are crucial for baking, so make sure you have these handy!
- Electric mixer or wooden spoon: Either works for creaming the butter and sugar. I love the old-fashioned feel of a wooden spoon, but a hand mixer saves time!
- Whisk: Perfect for mixing the dry ingredients together. It helps combine everything evenly.
- Baking sheets: You’ll need at least one for baking your cookies. Make sure they’re lined with parchment paper for easy removal!
- Parchment paper: This makes clean-up a breeze and prevents sticking. A must-have in my kitchen!
- Cookie cutters (optional): If you want to shape your cookies into fun designs, grab some cookie cutters that fit the spring theme!
- Cooling rack: Essential for letting your cookies cool after baking. It helps them maintain their texture and prevents sogginess.
With these tools at the ready, you’ll be all set to create your beautiful spring cookies. Happy baking!
Print
spring cookies aesthetic: 7 Delightful Recipes to Brighten Your Day
- Total Time: 32 minutes
- Yield: 24 cookies 1x
- Diet: Vegetarian
Description
A delightful recipe for spring-themed cookies that are visually appealing and tasty.
Ingredients
- 2 cups all-purpose flour
- 1 cup unsalted butter, softened
- 1 cup granulated sugar
- 1 large egg
- 1 teaspoon vanilla extract
- 1/2 teaspoon baking powder
- 1/4 teaspoon salt
- Food coloring (various colors)
- Sprinkles (optional)
Instructions
- Preheat your oven to 350°F (175°C).
- In a bowl, cream together the butter and sugar.
- Add the egg and vanilla extract, mix well.
- In another bowl, whisk together flour, baking powder, and salt.
- Gradually combine the dry ingredients with the wet mixture.
- Divide the dough into portions and color with food coloring.
- Shape the dough into cookies and place on a baking sheet.
- Add sprinkles if desired.
- Bake for 10-12 minutes until edges are lightly golden.
- Allow cookies to cool before serving.
Notes
- Store cookies in an airtight container.
- Use different shapes for a variety of designs.
- Can use icing to add more decorations.
- Prep Time: 20 minutes
- Cook Time: 12 minutes
- Category: Dessert
- Method: Baking
- Cuisine: American
Nutrition
- Serving Size: 1 cookie
- Calories: 150
- Sugar: 8g
- Sodium: 60mg
- Fat: 7g
- Saturated Fat: 4g
- Unsaturated Fat: 2g
- Trans Fat: 0g
- Carbohydrates: 20g
- Fiber: 0g
- Protein: 1g
- Cholesterol: 20mg
Keywords: spring cookies aesthetic