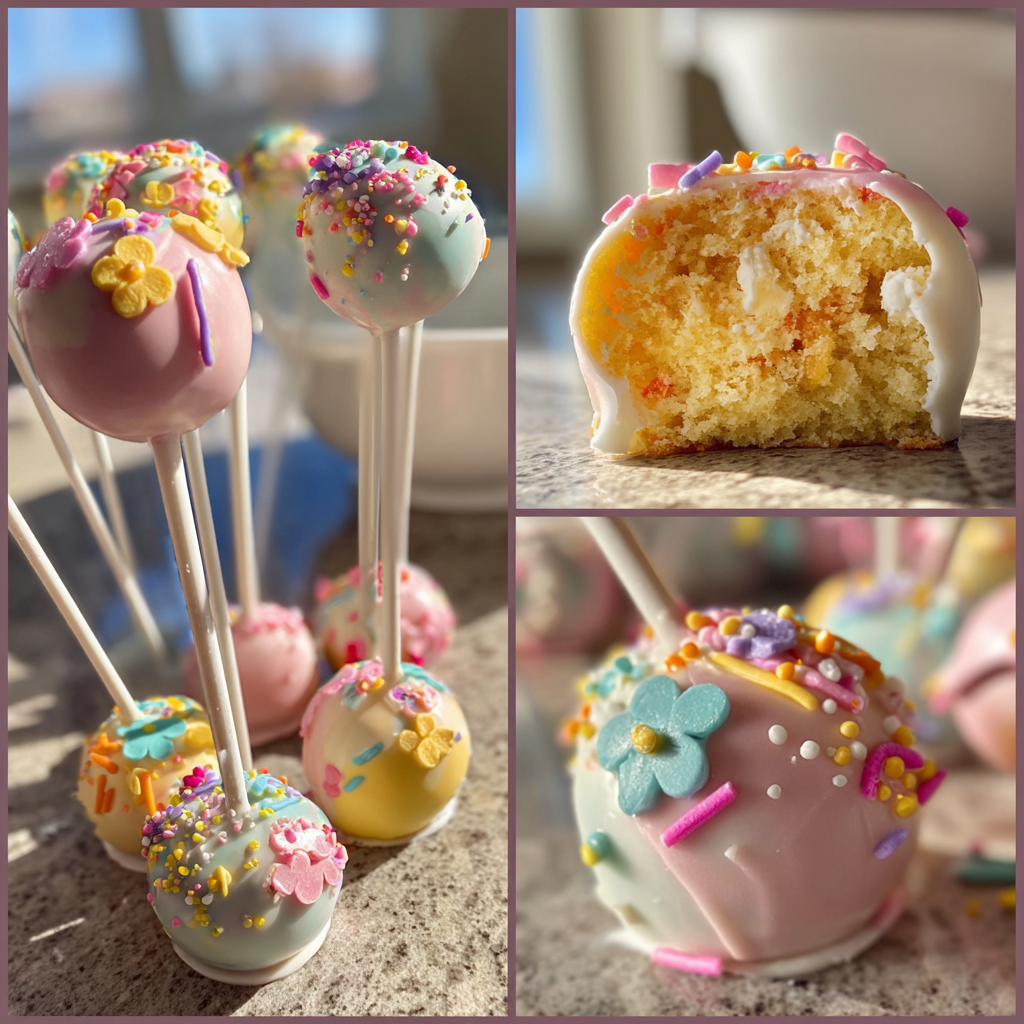
easter cake pops ideas: Foolproof Cake Pops in Under 60 Minutes
Looking for easter cake pops ideas? Then, you’ve landed in the right place! This recipe promises incredibly cute and delicious cake pops that are perfect for your Easter celebrations. Are you tired of complicated baking projects that take all day?
If so, you’re not alone. Instead, imagine serving adorable, festive treats that everyone will rave about without spending hours in the kitchen. Moreover, these easter cake pops ideas are not only fun to make but also a delightful way to get creative with your decorations.
The aroma of freshly baked cake mixing with sweet vanilla frosting fills the air. Furthermore, the colorful sprinkles and pastel-colored candy melts create a visually stunning treat. As a result, each bite is a perfect combination of moist cake and a crisp, sweet coating, making these cake pops irresistible.
Easter cake pops ideas aren’t just about satisfying your sweet tooth. In addition, they can offer some surprising health benefits, especially when you choose high-quality ingredients. For example, eggs, a key ingredient in cake, are a great source of protein and essential amino acids, vital for muscle repair and growth.
Moreover, eggs contain Vitamin D, which supports bone health and boosts your immune system. Furthermore, the butter used in the cake provides Vitamin A, important for vision and skin health. Best of all, even the small amount of dark chocolate used for decoration can offer antioxidants.
In addition, dark chocolate contains flavonoids, which can improve heart health. Also, these flavonoids act as antioxidants, protecting your cells from damage. It’s surprising how even a sweet treat can contribute to your overall well-being when enjoyed in moderation.
What sets these easter cake pops ideas apart from others? This recipe uses a simple, foolproof method that guarantees perfect cake pops every time. Instead of complicated baking techniques, this recipe focuses on simplicity and ease. As a result, you get moist, flavorful cake pops without the fuss.
Moreover, this recipe incorporates a unique frosting-to-cake ratio that ensures the perfect consistency for shaping and dipping. Best of all, it has proven successful for families, beginners, and even those hosting large Easter gatherings. So, you can trust that these cake pops will be a hit.
These easter cake pops ideas take just 30 minutes of prep time and 30 minutes of cook time, yielding about 24 cake pops. This recipe is perfect for beginner bakers and ideal for weeknight treats, Easter celebrations, or fun meal prep with the kids.
What are Easter Cake Pops?
Easter cake pops are bite-sized treats made from crumbled cake mixed with frosting, shaped into balls, and coated in melted chocolate or candy melts, decorated with festive Easter-themed sprinkles and designs. They are a fun and easy alternative to traditional Easter desserts.
Why You Will Love This Recipe
- These cake pops are incredibly easy to make, even for beginners.
- They are a fun and festive treat perfect for Easter celebrations.
- The recipe is customizable with different cake flavors, coatings, and decorations.
- They are a great way to use up leftover cake.
- These cake pops are a crowd-pleaser for both kids and adults.
Ingredients You Need
- Cake: Use your favorite cake recipe or a store-bought cake mix. Chocolate, vanilla, or funfetti cake work great.
- Frosting: Cream cheese or vanilla frosting binds the cake together and adds moisture.
- Candy Melts: Pastel-colored candy melts create a vibrant Easter-themed coating.
- Lollipop Sticks: These provide a handle for easy dipping and serving.
- Sprinkles: Easter-themed sprinkles add a festive touch and extra sweetness.
How to Make Easter Cake Pops Step by Step
- Bake or Crumble the Cake: Bake your favorite cake according to the recipe instructions. Alternatively, crumble a store-bought cake into a large bowl.
Pro Tip: Ensure the cake is completely cool before crumbling to prevent it from becoming mushy.
- Mix in the Frosting: Add frosting to the crumbled cake, a little at a time, until the mixture is moist and holds its shape when pressed together.
- Shape into Balls: Roll the cake mixture into small, even-sized balls (about 1-inch in diameter) and place them on a baking sheet lined with parchment paper.
- Chill the Cake Balls: Place the baking sheet in the refrigerator for at least 30 minutes to allow the cake balls to firm up.
Pro Tip: Chilling helps the cake balls hold their shape when dipping them in the melted candy.
- Melt the Candy Melts: Melt the candy melts according to the package instructions, stirring frequently to prevent burning.
- Dip the Lollipop Sticks: Dip the tip of each lollipop stick into the melted candy and insert it into a cake ball. This helps the stick adhere to the cake pop.
- Dip the Cake Pops: Dip each cake pop into the melted candy, ensuring it’s fully coated. Gently tap off any excess candy.
- Decorate with Sprinkles: Immediately sprinkle the cake pops with Easter-themed sprinkles before the candy coating sets.
- Let Set: Place the decorated cake pops back on the parchment-lined baking sheet or insert them into a styrofoam block to set completely.
Expert Tips for Best Results
- Use a high-quality cake mix or recipe for the best flavor and texture.
- Don’t add too much frosting, or the cake pops will be too soft and difficult to handle.
- Chill the cake balls thoroughly before dipping to prevent them from falling apart.
- Melt the candy melts slowly and stir frequently to avoid burning.
- Use a double boiler or microwave in short intervals to melt the candy melts evenly.
- Tap off excess candy coating to prevent drips and ensure a smooth finish.
- Work quickly when decorating with sprinkles, as the candy coating sets fast.
Variations and Substitutions
- Dietary: For a gluten-free option, use a gluten-free cake mix and gluten-free sprinkles.
- Regional: Try different cake flavors inspired by regional specialties, such as a lemon cake for a Sicilian twist.
- Seasonal: Decorate with seasonal sprinkles and colors, such as autumn leaves for fall or snowflakes for winter.
- Flavor: Add a drop of flavored extract, such as almond or peppermint, to the melted candy for an extra burst of flavor.
How to Serve and Store
Serve these easter cake pops ideas as a delightful dessert at your Easter brunch, as party favors, or as a sweet treat for kids. They can be displayed on a cake pop stand or arranged on a platter for an attractive presentation.
Store the cake pops in an airtight container in the refrigerator for up to 5 days. Freezing is not recommended, as the candy coating may crack and the cake may become dry.
Reheating is not necessary; however, allow the cake pops to come to room temperature for about 15-20 minutes before serving for the best flavor and texture.
Frequently Asked Questions
Can I use a different type of chocolate for the coating?
Yes, you can. White chocolate, milk chocolate, or dark chocolate can be used instead of candy melts. However, candy melts are designed to melt smoothly and set quickly.
How do I prevent the cake pops from cracking?
Cracking can occur if the cake balls are too cold or the candy coating is too hot. Ensure the cake balls are chilled but not frozen and melt the candy slowly.
Can I make these cake pops ahead of time?
Yes, you can. Cake pops can be made 1-2 days in advance and stored in the refrigerator in an airtight container.
What if my candy melts are too thick?
If the candy melts are too thick, add a small amount of vegetable shortening or coconut oil to thin them out. Stir well until smooth.
Can I use homemade frosting instead of store-bought?
Yes, you can. Homemade frosting can be used, but make sure it is not too thin or runny, as this can make the cake pops too moist.
How do I keep the sprinkles from falling off?
Sprinkle the cake pops immediately after dipping them in the melted candy, while the coating is still wet. This will help the sprinkles adhere properly.
In conclusion, these easter cake pops ideas are a fun, easy, and festive treat that everyone will love. They offer a perfect combination of convenience and creativity. Try this recipe today and leave a comment below!
Print
easter cake pops ideas: Foolproof Cake Pops in Under 60 Minutes
- Total Time: 1
- Yield: 24 cake pops 1x
Description
These adorable Easter cake pops are the perfect festive treat! Customize them with your favorite cake and frosting flavors, then decorate with pastel-colored candy melts, sprinkles, and edible decorations. They’re easy to make and fun for all ages!
Ingredients
- 1 box Cake (Your favorite flavor (vanilla, chocolate, lemon, etc.) Baked and cooled completely.)
- 1/2 cup Frosting (Your favorite flavor (vanilla, chocolate, cream cheese, etc.))
- 12 oz Candy Melts (Pastel colors (pink, yellow, blue, green, purple, white))
- 24 Cake Pop Sticks
- As needed Sprinkles (Easter-themed sprinkles, jimmies, nonpareils)
- As needed Edible Decorations (Edible eyes, sugar flowers, bunny ears, chick decorations)
- 1–2 teaspoons Vegetable Shortening or Coconut Oil (To thin candy melts, if needed.)
Instructions
- Prepare the Cake: Bake the cake according to package directions. Let cool completely.
- Crumble the Cake: In a large bowl, crumble the cooled cake with your hands until it is finely textured.
- Mix in Frosting: Add the frosting to the crumbled cake and mix well until a dough-like consistency is formed. Do not overmix.
- Shape into Balls: Roll the cake mixture into 1-inch balls. Place the cake balls on a parchment-lined baking sheet. Chill in the refrigerator for at least 30 minutes to firm up.
- Melt Candy Melts: Melt the candy melts in separate bowls in the microwave in 30-second intervals, stirring in between, until smooth. If the candy melts are too thick, add a teaspoon of vegetable shortening or coconut oil to thin them out.
- Dip Cake Pops: Dip the tip of a cake pop stick into the melted candy and insert it halfway into a chilled cake ball. Repeat with all cake balls. Return to the refrigerator for 10 minutes to set.
- Coat Cake Pops: Dip each cake pop into the melted candy, ensuring it is fully coated. Gently tap off any excess candy.
- Decorate: Immediately decorate with sprinkles and edible decorations before the candy coating sets.
- Set and Serve: Place the decorated cake pops back on the parchment-lined baking sheet or insert them into a styrofoam block to set. Let the candy coating harden completely before serving. Store in an airtight container at room temperature.
- Prep Time: 45
- Cook Time: 15