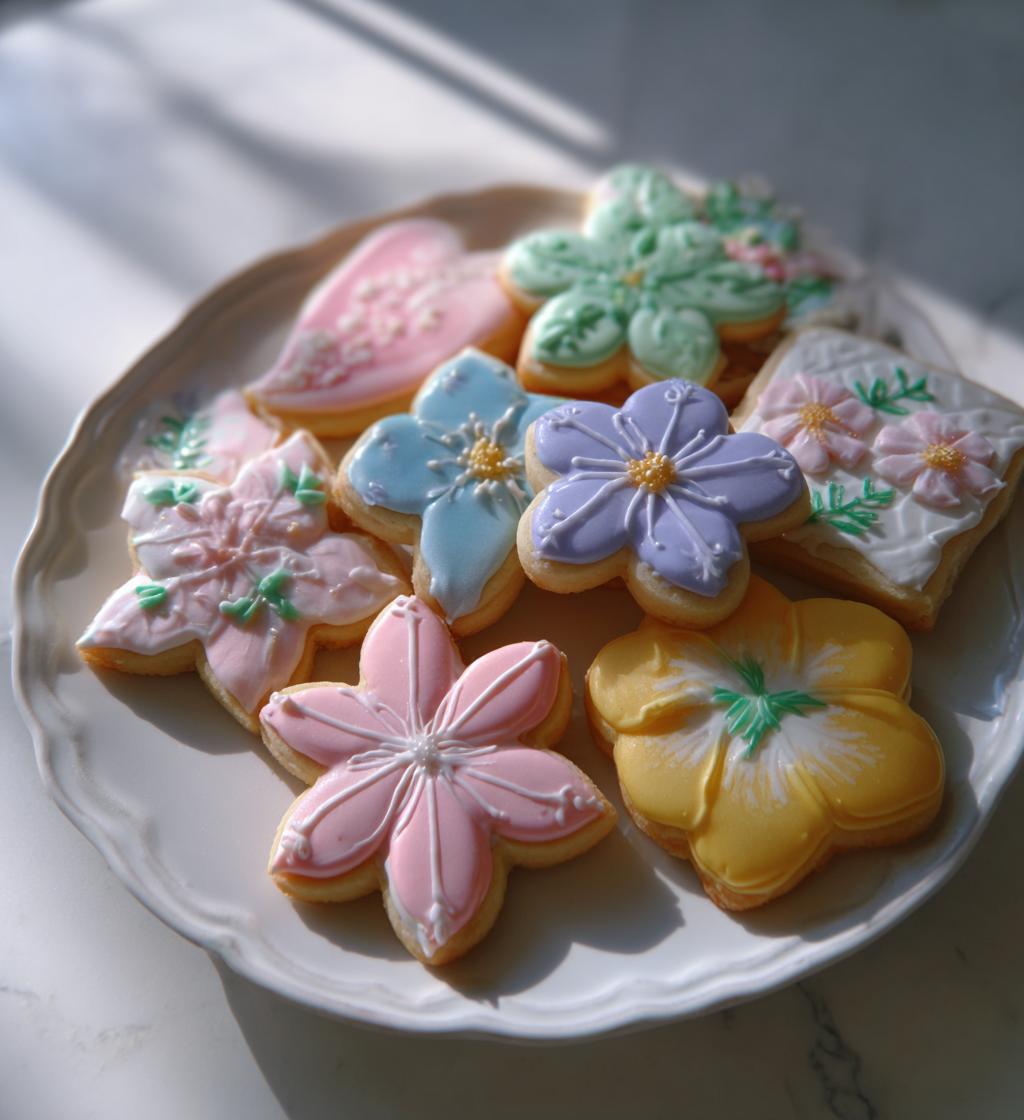
Ah, spring! The season of blooming flowers, chirping birds, and the sweet scent of freshly baked cookies wafting through the house. I can’t help but get giddy at the thought of making these *spring cookies decorated simple*! They’re not just cookies; they’re little canvases ready to be adorned with colorful royal icing, making them perfect for any occasion, from family gatherings to school parties. I remember the first time I decorated cookies with my kids – it was a delightful mess of icing and laughter that turned into a cherished memory. Each cookie was a little masterpiece, full of personality and joy. Trust me, when you see those vibrant colors come to life, it’s pure magic. Plus, they’re so easy to whip up! So, roll up your sleeves, and let’s dive into a world of springtime sweetness together!
Ingredients List
To create the most delightful *spring cookies decorated simple*, you’ll want to gather a few basic ingredients that work together to create that perfect cookie base. Here’s what you need:
- 2 cups all-purpose flour: This is the backbone of your cookie dough, providing structure and texture.
- 1 cup unsalted butter, softened: Butter adds richness and flavor. Make sure it’s at room temperature for easy creaming!
- 1 cup granulated sugar: This sweetens the cookies and helps them achieve that lovely, tender bite.
- 1 large egg: A binding agent that brings everything together while adding moisture.
- 1 teaspoon vanilla extract: This adds a warm, comforting flavor that elevates your cookies.
- 1/2 teaspoon baking powder: This helps the cookies rise just the right amount, keeping them light and airy.
- 1/4 teaspoon salt: A pinch of salt enhances the flavors and balances the sweetness.
- Royal icing for decoration: The fun part! This icing will help you create beautiful designs on your cookies.
- Food coloring: Use this to add pops of color to your royal icing and bring your cookies to life!
Gathering these ingredients will set you off on a sweet adventure. Let’s get to baking!
How to Prepare Instructions
Now that we’ve got our ingredients ready, let’s dive into the fun part: making these adorable cookies! Follow these simple steps to create your delicious spring cookies.
Prepping the Dough
First things first, you’ll want to cream together the softened butter and granulated sugar in a large mixing bowl. Use a hand mixer or a sturdy wooden spoon to mix until the mixture is smooth and light in color—aim for about 2-3 minutes of mixing. It should feel fluffy and just a bit airy. Next, crack in that large egg and pour in the vanilla extract. Mix well until everything is combined and you see no more streaks of egg. This is where the magic starts, and you can already smell the sweetness coming together!
Making the Cookies
In a separate bowl, whisk together the all-purpose flour, baking powder, and salt. This step is super important because it ensures the dry ingredients are well combined before they meet the wet ones. Gradually add this dry mixture to your butter mixture, stirring gently until everything is just combined. You want to avoid overmixing, as that can lead to tough cookies! Once it’s all mixed, you’ll have a nice dough that’s ready to be rolled out. Dust your work surface with flour and roll out the dough to about 1/4 inch thick. It’s a bit of a workout, but oh-so-worth it!
Baking the Cookies
Now comes the fun part! Grab your favorite cookie cutters and cut out shapes from the rolled-out dough. Place each cookie on a baking sheet lined with parchment paper, giving them a little space to spread while baking. Pop the sheet into a preheated oven at 350°F (175°C) and bake for about 10-12 minutes, or until the edges are lightly golden. Your kitchen will smell heavenly during this time! Once done, let them cool on the baking sheet for a few minutes before transferring them to a wire rack. Make sure they cool completely before you get to the best part—decorating!
Decorating the Cookies
Once your cookies are cool, it’s time to unleash your creativity with royal icing! Prepare your royal icing according to your favorite recipe, and divide it into bowls if you want to use different colors. Add food coloring to each bowl to create a vibrant palette for decorating. Using piping bags or simple plastic squeeze bottles, decorate your cookies with fun designs. Don’t worry if it gets a little messy; that’s part of the fun! Just let the icing dry completely before you even think about stacking these beauties.
Nutritional Information Section
Now, let’s chat about the nutritional side of these delightful *spring cookies decorated simple*. Each cookie brings a burst of sweetness and joy, but it’s always good to know what you’re indulging in! Here’s a breakdown of the nutrition for one cookie:
- Calories: 150
- Sugar: 10g
- Sodium: 50mg
- Fat: 8g
- Saturated Fat: 5g
- Unsaturated Fat: 3g
- Trans Fat: 0g
- Carbohydrates: 18g
- Fiber: 0g
- Protein: 1g
- Cholesterol: 30mg
Keep in mind, these values can vary based on the specific ingredients you use or the brands you choose. So, while I’m giving you a general idea, it’s not an exact science. Enjoy these cookies in moderation, and most importantly, savor every bite!
Tips for Success
Alright, friends! Let’s make sure your *spring cookies decorated simple* turn out perfectly every time. With a few handy tips, you’ll be a cookie-decorating pro in no time!
Chill Your Dough
If your dough feels sticky when rolling it out, don’t hesitate to chill it in the fridge for 30 minutes. This makes it much easier to handle and helps prevent the cookies from spreading too much while baking. Plus, it gives you a little break to clean up the floury mess!
Watch the Baking Time
Ovens can be tricky, so keep an eye on your cookies as they bake. It’s better to take them out a minute or two early than to risk overbaking. You want those edges lightly golden and the centers just set. They’ll continue to firm up as they cool, so don’t worry if they look a tad soft when you pull them out!
Storage Tips
After decorating, store your cookies in an airtight container at room temperature. They’ll stay fresh for about a week, but trust me, they’re likely to disappear long before that! If you’re stacking them, place parchment paper between layers to prevent any icing from sticking.
Icing Drying Times
When it comes to royal icing, patience is key! Allow your decorated cookies to dry completely at room temperature for at least 6-8 hours. If you’re in a hurry, a fan can help speed up the process, but avoid direct sunlight, which can cause the colors to fade. Once the icing is dry, feel free to stack them or package them up as sweet gifts!
Have Fun with It!
Lastly, don’t stress too much about perfection. The best part of decorating cookies is letting your creativity shine! Each cookie can be a little different, and that’s what makes them special. Embrace the mess and enjoy the process—after all, it’s all about sharing joy, one decorated cookie at a time!
Variations
Now that you’ve mastered the basics of these *spring cookies decorated simple*, let’s get a little adventurous! There are so many fun ways to mix things up and make this recipe your own. Here are some delightful variations to consider:
Different Shapes and Sizes
Who says cookies have to be round? Grab your favorite cookie cutters and get creative! You can make flowers, bunnies, or even butterflies to celebrate the beauty of spring. If you’re feeling ambitious, try layering smaller shapes on top of larger ones for an adorable 3D effect. Just remember to adjust your baking time slightly for smaller cookies!
Flavor Infusions
Want to take your cookies to the next level? Experiment with different flavors! Instead of just vanilla extract, try adding almond extract for a nutty twist or a splash of lemon extract for a refreshing zing. You can even mix in some finely grated citrus zest for an extra burst of flavor. Trust me, your taste buds will thank you!
Fun Mix-Ins
Add some texture to your cookies by incorporating mix-ins! Chopped nuts, mini chocolate chips, or pastel-colored sprinkles can all work beautifully. Just fold them in gently after combining your dough. I love the crunch from walnuts or the surprise of chocolate melting in every bite!
Colorful Icing Techniques
Let your inner artist shine by trying out different icing techniques! Consider flooding your cookies with a base layer of royal icing and then piping on details once it’s dry. You can create beautiful marbled effects by swirling together two colors of icing before it sets. The possibilities are endless, and it’s a fantastic way to make each cookie a unique masterpiece!
Seasonal Variations
As the seasons change, so can your cookie designs! For spring, think pastel colors and floral patterns. In summer, you might want to add bright fruit colors or beach-themed decorations. For fall, consider pumpkin spice flavors and autumn leaf shapes, while winter can bring out snowflakes and cozy holiday designs. Adapting your cookies to the season is a delightful way to keep things exciting!
With these variations, you can make your *spring cookies decorated simple* truly your own. Experiment and have fun—each batch is a chance to create something new and delicious!
Serving Suggestions
Now that you’ve whipped up a batch of those delightful *spring cookies decorated simple*, it’s time to think about how to enjoy them! These cookies are perfect on their own, but pairing them with the right accompaniments can elevate your treat experience to a whole new level!
Perfect Pairings with Beverages
First off, let’s talk drinks! A classic choice is a nice cup of tea—think chamomile or a light green tea. The floral notes in these teas complement the sweetness of the cookies beautifully. If you prefer coffee, a smooth latte or a sweet vanilla-flavored brew works wonderfully too. For a refreshing twist, serve your cookies with a glass of lemonade or iced tea, especially on those warm spring afternoons. Trust me, the combination is simply delightful!
Complement with Other Desserts
If you’re hosting a gathering or just want to indulge a little, consider serving your cookies alongside other desserts. A light fruit salad can balance the sweetness with some refreshing natural flavors. Maybe a scoop of vanilla ice cream would be a fantastic match, allowing those colorful cookies to shine as a topping. You could even create an adorable cookie ice cream sandwich for a fun treat that kids and adults alike will love!
Creative Presentation Ideas
Presentation matters, too! Arrange your cookies on a beautiful platter and sprinkle some edible flowers or fresh mint leaves around them for a springtime vibe. You could even include little decorative tags with fun messages or themes that match your cookie designs. It adds a personal touch that makes serving them extra special!
Remember, whether you’re enjoying these cookies alone or sharing them with loved ones, the joy they bring is what counts. So grab your favorite drink, set up a lovely display, and savor every bite of your sweet creations!
FAQ Section
Q1. Can I use different types of flour for these cookies?
Absolutely! While all-purpose flour gives the best results for texture, you can experiment with alternatives like almond flour or whole wheat flour. Just keep in mind that it may change the texture and flavor a bit, so adjust accordingly!
Q2. What if I don’t have royal icing?
No worries! If royal icing isn’t in your pantry, you can use a simple glaze made from powdered sugar and milk. Just mix until smooth and drizzle it over your cookies for a sweet finish. It won’t hold decorations as well, but it’ll still taste great!
Q3. How long will these cookies stay fresh?
Stored properly in an airtight container, your *spring cookies decorated simple* can stay fresh for about a week. Just make sure the icing is completely dry before stacking them to prevent any smudging!
Q4. Can I freeze the cookie dough?
Yes, you can! If you want to prep ahead, wrap the dough tightly in plastic wrap and store it in the freezer for up to three months. When you’re ready to bake, just thaw it in the fridge overnight before rolling it out and decorating.
Q5. What’s the best way to achieve vibrant icing colors?
When mixing food coloring into your royal icing, start with a small amount and gradually add more until you reach your desired shade. Gel food colorings tend to give the best results, so if you can find those, they’re worth it!
Q6. Can I add flavors to the royal icing?
Definitely! You can add a few drops of flavor extracts, like almond or lemon, to your royal icing for a fun twist. Just be careful not to add too much liquid, or it might affect the icing’s consistency.

Spring Cookies Decorated Simple: 5 Joyful Tips for Success
- Total Time: 32 minutes
- Yield: 24 cookies 1x
- Diet: Vegetarian
Description
Simple decorated spring cookies that are fun and easy to make.
Ingredients
- 2 cups all-purpose flour
- 1 cup unsalted butter, softened
- 1 cup granulated sugar
- 1 large egg
- 1 teaspoon vanilla extract
- 1/2 teaspoon baking powder
- 1/4 teaspoon salt
- Royal icing for decoration
- Food coloring
Instructions
- Preheat your oven to 350°F (175°C).
- In a bowl, cream together butter and sugar until smooth.
- Add egg and vanilla, mixing well.
- In another bowl, whisk together flour, baking powder, and salt.
- Gradually add the dry mixture to the wet mixture, stirring until combined.
- Roll out the dough on a floured surface to about 1/4 inch thick.
- Cut out shapes with cookie cutters.
- Place cookies on a baking sheet lined with parchment paper.
- Bake for 10-12 minutes or until edges are lightly golden.
- Let cookies cool completely before decorating with royal icing.
Notes
- Store cookies in an airtight container.
- Use different food coloring for various designs.
- Allow icing to dry completely before stacking cookies.
- Prep Time: 20 minutes
- Cook Time: 12 minutes
- Category: Dessert
- Method: Baking
- Cuisine: American
Nutrition
- Serving Size: 1 cookie
- Calories: 150
- Sugar: 10g
- Sodium: 50mg
- Fat: 8g
- Saturated Fat: 5g
- Unsaturated Fat: 3g
- Trans Fat: 0g
- Carbohydrates: 18g
- Fiber: 0g
- Protein: 1g
- Cholesterol: 30mg
Keywords: spring cookies decorated simple